Set Up a Bulk RNA-Seq Environment on Ubuntu and macOS
Most RNA-seq tutorials start with a pipeline diagram. This one does not.
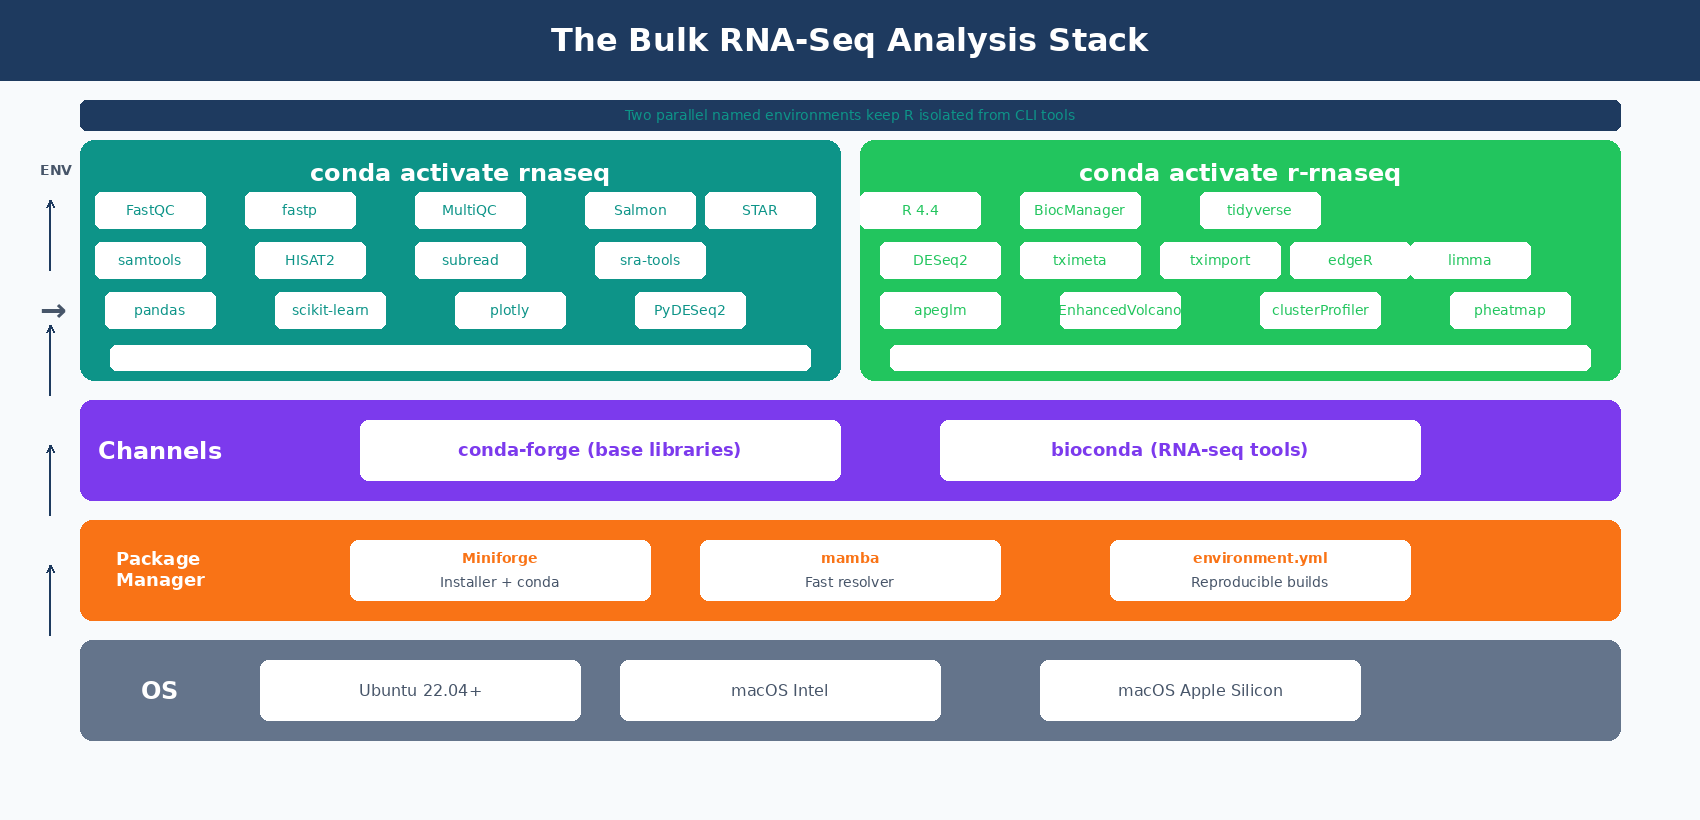
Before you can run a single line of DESeq2 code, you need a working environment. That means conda, the right channels, a locked-down set of tool versions, and an R installation that can actually compile Bioconductor packages without failing at gfortran.
This first post in the series shows you exactly how to build that environment from a clean laptop. Linux, macOS Intel, and Apple Silicon are all covered. The goal is a reproducible setup you can rebuild from a single environment.yml file six months from now.
What You Need Before You Start
Your machine needs to meet a few minimum specs. Skip this check and you will hit a wall at the indexing step.
RAM: 16 GB minimum for Salmon. 64 GB for STAR with a human genome. If you have 8 GB, you can still do QC and DESeq2 but you cannot build a STAR index locally.
Disk: 100 GB free for a typical 6-sample human experiment. Reference files alone take around 30 GB.
OS: Ubuntu 22.04 or newer on Linux. macOS 13 Ventura or newer. Windows works only through WSL2.
Terminal: You need to be comfortable running commands in bash or zsh. If you have never opened Terminal, start with a shell tutorial first.
Apple Silicon users, read this first
If you have an M1, M2, M3, or M4 Mac, you must install the ARM64 version of Miniforge. Do not use the Intel installer, even with Rosetta. Bioconda has full ARM64 support since 2024, so most tools install natively. A few legacy R packages still need extra setup. We cover that below.
How to Install Miniforge on Linux and macOS
We use Miniforge instead of Anaconda or Miniconda. Three reasons.
Miniforge ships with conda-forge pre-configured and no Anaconda defaults channel. Since 2024, Anaconda Inc. requires a paid license for research institutions using their defaults channel. Miniforge sidesteps this entirely.
Miniforge also bundles mamba, which is a drop-in replacement for conda that resolves dependencies about 10x faster. For any non-trivial bioinformatics environment this matters a lot.
Linux x86_64 installation
# Download the installerwget "https://github.com/conda-forge/miniforge/releases/latest/download/Miniforge3-Linux-x86_64.sh"
# Run it (accept defaults, answer yes when asked about conda init)bash Miniforge3-Linux-x86_64.sh
# Close and reopen your terminal, then verifyconda --version# conda 24.11.3
mamba --version# mamba 1.5.10
macOS installation (Intel and Apple Silicon)
# Apple Silicon (M1/M2/M3/M4)curl -L -O "https://github.com/conda-forge/miniforge/releases/latest/download/Miniforge3-MacOSX-arm64.sh"bash Miniforge3-MacOSX-arm64.sh
# Intel Maccurl -L -O "https://github.com/conda-forge/miniforge/releases/latest/download/Miniforge3-MacOSX-x86_64.sh"bash Miniforge3-MacOSX-x86_64.sh
Restart your terminal after the installer finishes.
Verify the installation. Your prompt should now show (base) at the start.
which condawhich mamba# /Users/yourname/miniforge3/bin/mambaNever install packages into the base environment
The (base) environment is for managing other environments, nothing else. Always create a named environment for your project. This keeps your setup reproducible and makes it easy to wipe and rebuild when something breaks.
How to Configure the Bioconda Channel Correctly
Bioconda is the channel that hosts most RNA-seq tools. Configure it once per machine.
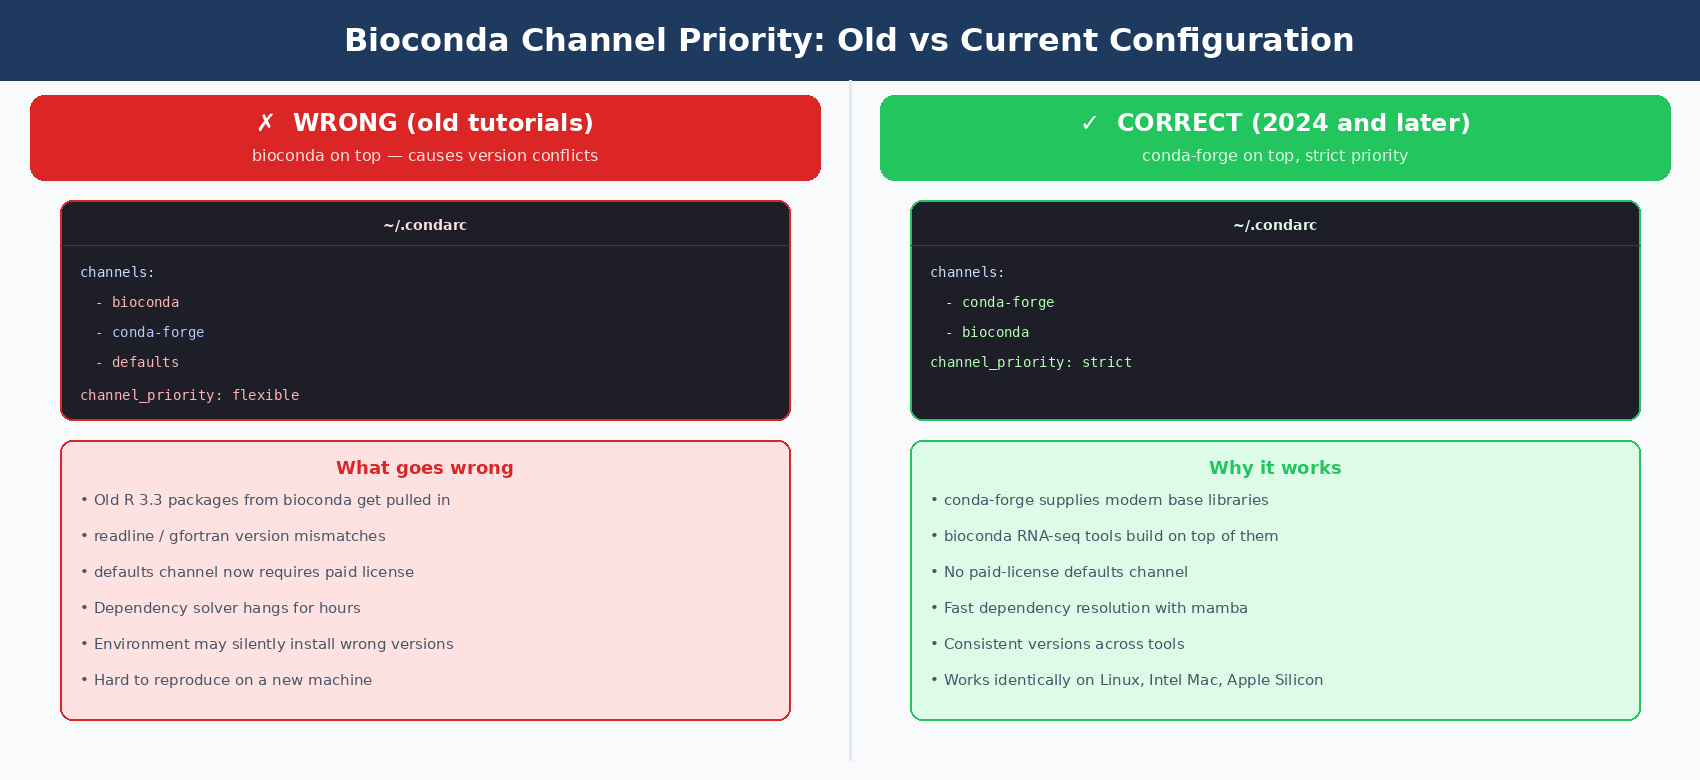
The channel priority matters. Bioconda’s official docs recommend this exact order (Bioconda usage documentation).
conda config --add channels biocondaconda config --add channels conda-forgeconda config --set channel_priority strictThe last command is the critical one. Strict priority prevents conda from mixing packages across channels in ways that break your environment.
Verify the configuration.
cat ~/.condarcYou should see:
channels: - conda-forge - biocondachannel_priority: strictWhy conda-forge goes first, not bioconda
Older tutorials tell you to put bioconda on top. That recommendation is outdated. Bioconda depends on conda-forge for most of its base libraries. If bioconda has higher priority, conda will pull in older R and Python versions from bioconda that do not match newer tools. The current recommended order is conda-forge first, bioconda second, strict priority.
How to Create a Reproducible RNA-Seq conda Environment with environment.yml
Now for the actual environment. We define it in a YAML file instead of running a series of conda install commands.
Why a file? Because in six months you will want to rebuild this exact environment on a new machine. A conda install history is lost the moment your terminal closes. An environment.yml is version-controlled and reproducible.
Create a file called rnaseq-env.yml:
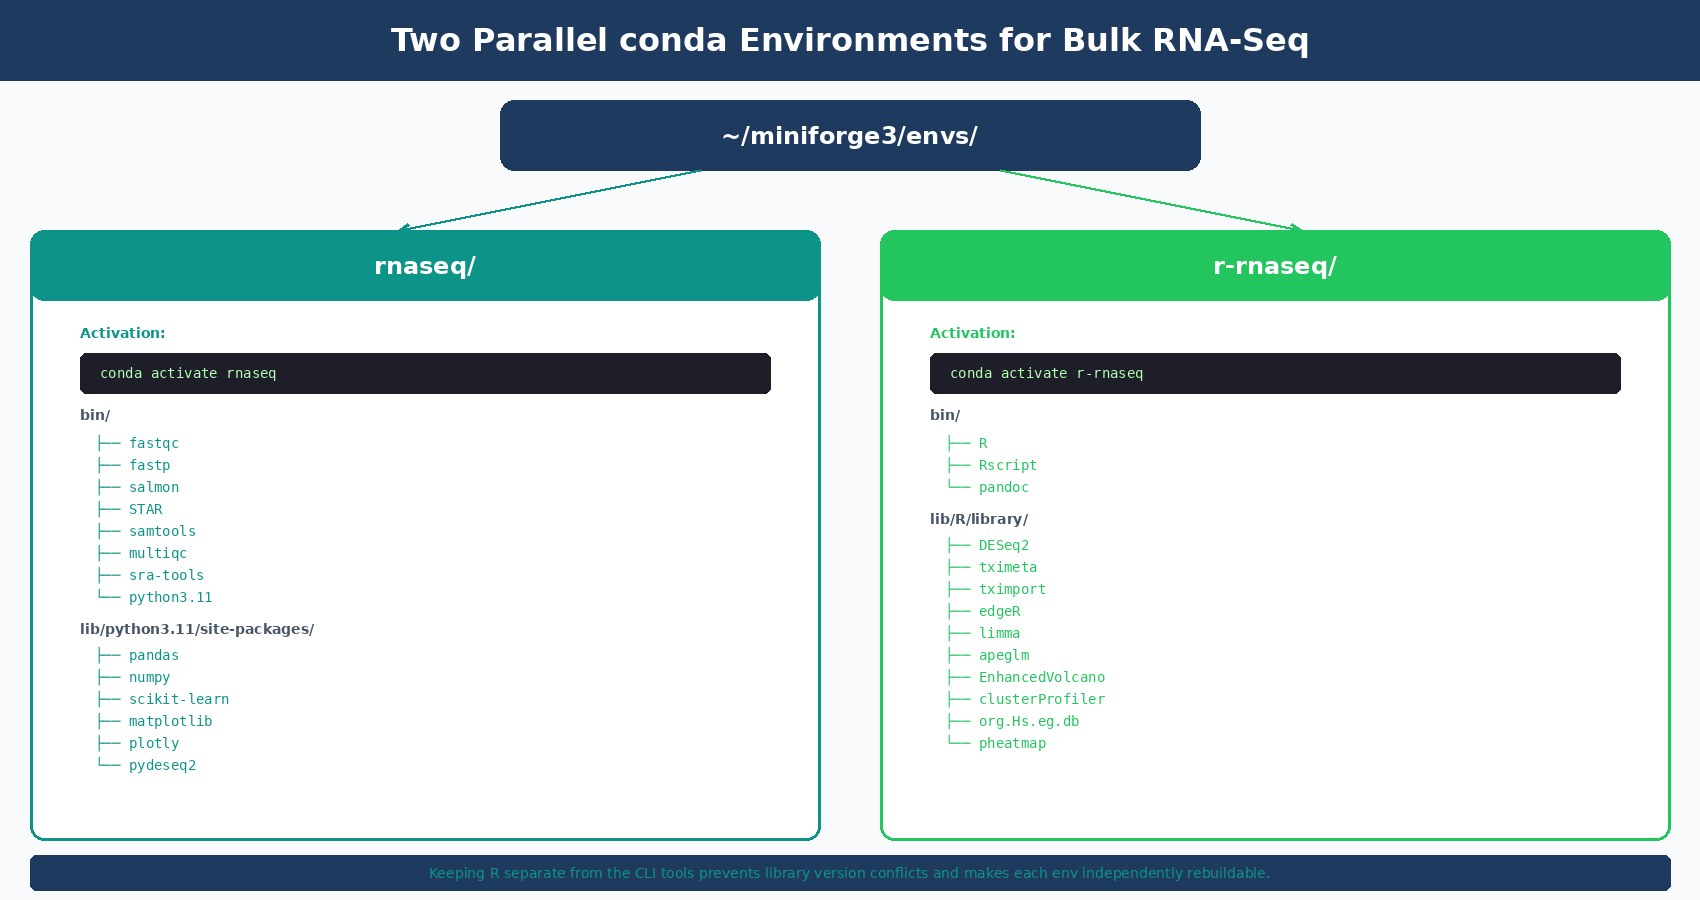
name: rnaseqchannels:  - conda-forge  - bioconda
dependencies:  # Core Python  - python=3.11  - pip
  # QC tools  - fastqc=0.12.1  - fastp=0.24.0  - multiqc=1.25.1
  # Quantification and alignment  - salmon=1.10.3  - star=2.7.11b  - hisat2=2.2.1
  # BAM handling  - samtools=1.21  - subread=2.0.8      # for featureCounts
  # Data download  - sra-tools=3.1.1  - parallel=20240922  # GNU parallel for batch jobs
  # Python data science stack  - pandas=2.2.3  - numpy=2.1.3  - scipy=1.14.1  - scikit-learn=1.5.2  - matplotlib=3.9.2  - seaborn=0.13.2  - plotly=5.24.1
  # Python DEA  - pip:      - pydeseq2==0.5.4      - gseapy==1.1.4      - mygene==3.2.2
Every package is pinned to a specific version. This is intentional.
A pandas=2.2 pin means you always get the same minor version. When you publish your results, another lab can recreate your exact stack by running one command.
Create the environment
# Use mamba for speed (10x faster than conda here)mamba env create -f rnaseq-env.yml
# Activate itconda activate rnaseq
# Your prompt now shows (rnaseq) instead of (base)
This takes 5-15 minutes depending on your network. Mamba downloads and resolves everything in parallel.
Verify the tools work
fastqc --version # FastQC v0.12.1fastp --version # fastp 0.24.0salmon --version # salmon 1.10.3STAR --version # 2.7.11bsamtools --version | head -1 # samtools 1.21multiqc --version # multiqc, version 1.25.1If any of these fail, see the error section at the end.
| Category | Tools in the Environment | What They Do |
|---|---|---|
| QC | FastQC, fastp, MultiQC | Read quality checks and trimming |
| Alignment | STAR, HISAT2 | Map reads to a reference genome |
| Quantification | Salmon, Subread (featureCounts) | Count reads per gene |
| Handling | samtools | View, sort, and index BAM files |
| Data fetch | sra-tools, GNU parallel | Download public FASTQ from SRA |
| Python analysis | pandas, scikit-learn, plotly, PyDESeq2, gseapy | Load counts, run DE and enrichment |
How to Install R 4.4 and Bioconductor Packages for DESeq2
R goes in its own environment. Mixing R into the bioinformatics tools environment tends to cause library version conflicts.
Create a second YAML file, r-rnaseq.yml:
name: r-rnaseqchannels:  - conda-forge  - bioconda
dependencies:  - r-base=4.4.2  - r-essentials=4.4  - r-tidyverse=2.0.0  - r-ggplot2=3.5.1  - r-ggrepel=0.9.6  - r-patchwork=1.3.0  - r-pheatmap=1.0.12  - r-biocmanager=1.30.25
  # Some Bioconductor packages are pre-built on bioconda  - bioconductor-deseq2=1.46.0  - bioconductor-tximeta=1.24.0  - bioconductor-tximport=1.34.0  - bioconductor-edger=4.4.0  - bioconductor-limma=3.62.1  - bioconductor-apeglm=1.28.0  - bioconductor-enhancedvolcano=1.24.0  - bioconductor-clusterprofiler=4.14.4  - bioconductor-org.hs.eg.db=3.20.0  - bioconductor-org.mm.eg.db=3.20.0
Create and activate:
mamba env create -f r-rnaseq.ymlconda activate r-rnaseqVerify R and DESeq2 work:
R --version# R version 4.4.2
R -e "library(DESeq2); sessionInfo()"# Should print DESeq2 1.46.0 in the loaded packages list
Why install DESeq2 from bioconda instead of BiocManager
Installing DESeq2 through BiocManager::install("DESeq2") inside R works, but it compiles from source. That takes 20 to 40 minutes and fails on Apple Silicon without gfortran manually installed. The bioconductor-deseq2 package on bioconda is pre-compiled for your platform, so it installs in seconds. Use the R route only if you need a package not yet on bioconda.
Fixing the Most Common Install Errors
A few errors come up often enough to cover here. These are the ones that have eaten the most grad student hours.
”Unable to find conflicting dependencies”
This almost always means your channel priority is wrong. Run:
conda config --show channelsIf you see defaults anywhere in the list, remove it:
conda config --remove channels defaultsThen rebuild the environment from the YAML file.
DESeq2 compilation fails on Apple Silicon
This happens when you install DESeq2 from inside R on an M-series Mac without gfortran. You will see an error like clang: error: linker command failed with exit code 1.
The fix: install DESeq2 through bioconda as shown above. If you must use BiocManager, install gfortran first from gcc.gnu.org/wiki/GFortranBinaries, then create a ~/.R/Makevars file pointing to it.
Packages install but R cannot find them
You activated the wrong environment. Run conda deactivate until your prompt shows (base), then conda activate r-rnaseq. The R in your PATH should then be the one inside the environment:
which R# Should be /Users/yourname/miniforge3/envs/r-rnaseq/bin/R# NOT /usr/local/bin/R or /Library/Frameworks/R.framework/...Environment creation takes hours and never finishes
You are probably using conda env create instead of mamba env create. Cancel it with Ctrl+C and use mamba. If you already have conda but not mamba, install mamba into your base environment:
conda install -n base -c conda-forge mambamacOS: “operation not permitted” when running tools
macOS Gatekeeper is blocking binaries from conda. First time you run each tool, you may need to right-click the binary in Finder and select Open. Usually happens once per binary, not repeatedly.
Do not mix pip install with conda install for the same package
Installing a package with pip after conda has already installed it creates two parallel copies. R imports get confused, Python imports break randomly. If a package is available in conda-forge or bioconda, always use conda. Reserve pip for packages like PyDESeq2 that are not yet on bioconda.
Exporting and Sharing Your Environment
Once your environment works, export it so you can rebuild or share it.
conda activate rnaseqconda env export > rnaseq-env-lock.yml
# Or without the build strings (more portable across OS)conda env export --no-builds > rnaseq-env.yml
Commit this file to your git repository. Anyone who clones your repo can rebuild the exact environment with:
mamba env create -f rnaseq-env.ymlThat is the whole reason we pinned versions upfront. Reproducibility is not a bonus, it is the reason to use conda at all.
Manual Setup vs NotchBio: What You Actually Have to Maintain
Setting up this environment takes between one and three hours for someone who has done it before. Closer to a full day for someone who has not.
That is just the first time. You also have to maintain it. New versions of tools arrive every few months. A fresh macOS release sometimes breaks an installer. Bioconductor releases new versions of DESeq2 twice a year.
If you are running RNA-seq analyses regularly, this maintenance is part of the job. If you are running it occasionally or you just want to focus on the biology, it is pure overhead.
NotchBio handles the environment for you. The same tools covered in this post run on our infrastructure with pinned versions and verified compatibility. You upload FASTQ files or a count matrix, and the pipeline runs without you touching conda once.
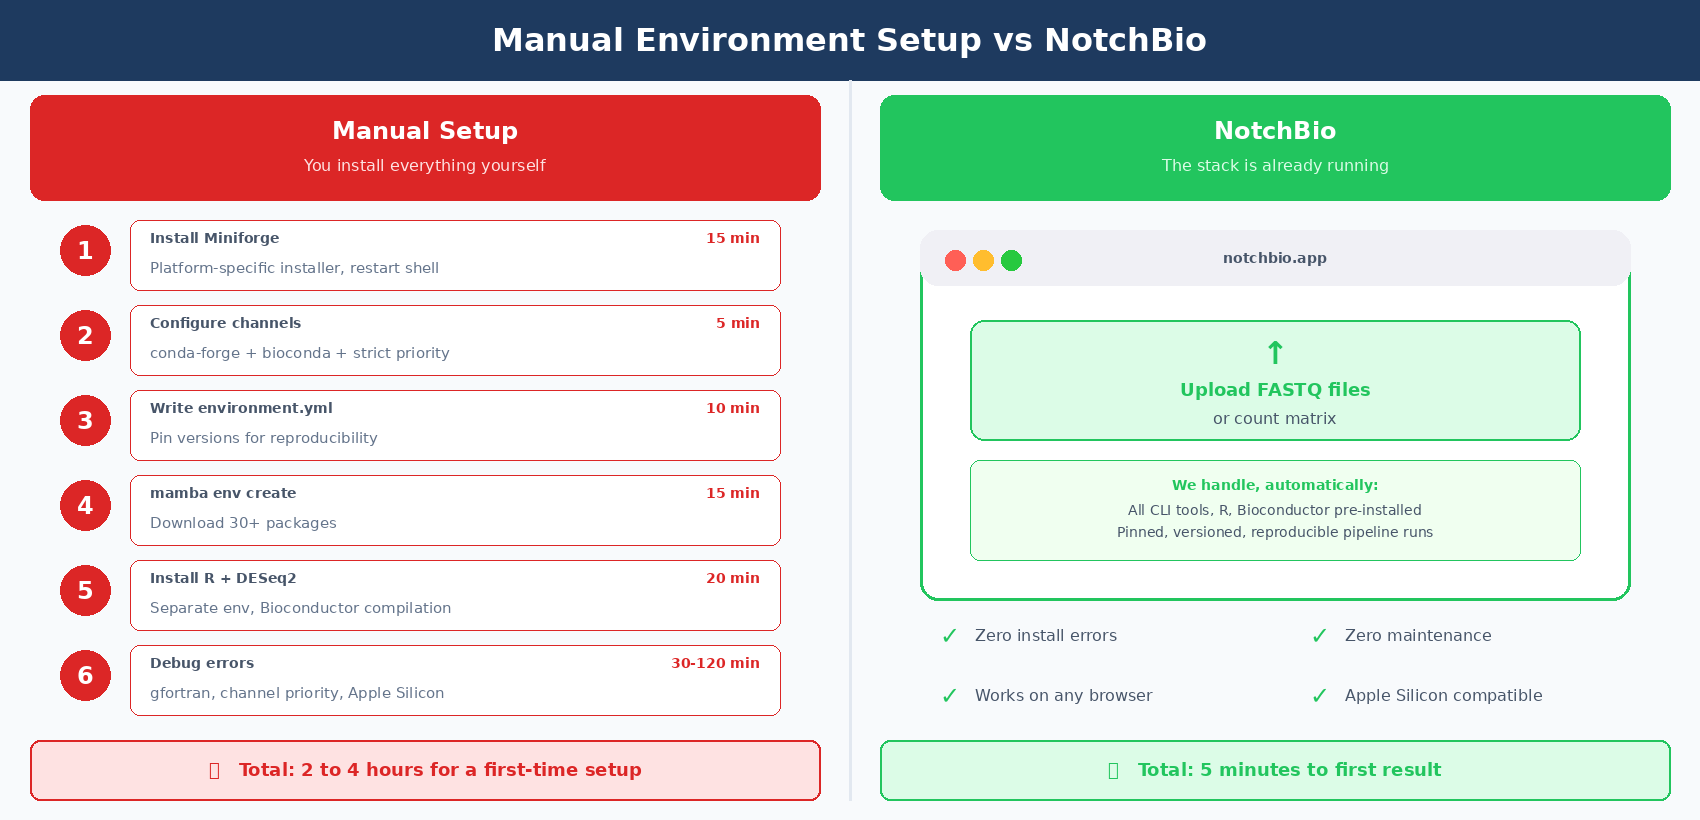
The comparison below shows where each approach pays off.
| Dimension | Manual Setup (This Tutorial) | NotchBio |
|---|---|---|
| First-time setup | 1 to 3 hours, longer for beginners | 0 minutes |
| Install errors | You debug conda conflicts, gfortran, channel priority | None, stack is pre-built |
| OS support | Linux and macOS; Windows needs WSL2 | Any browser on any OS |
| Apple Silicon | Mostly works; a few R packages still need workarounds | Fully supported out of the box |
| Version lock | Manual, via environment.yml you maintain | Built in, every run is version-tagged |
| Tool updates | You decide when to upgrade and rebuild | Managed centrally with changelogs |
| Reproducibility | Good, if you commit your YAML file | Guaranteed, every run is reproducible |
| Time to first result | 4 to 8 hours for a new user | 5 minutes after upload |
| Maintenance cost | Ongoing: ~1 day per month on active projects | Zero |
| Good fit for | Custom pipelines, advanced users, HPC clusters | Fast results, busy labs, teaching settings |
Where to Go Next
With the environment in place, the natural next steps are getting data and checking its quality before you analyze anything:
- How to Download RNA-Seq Data from GEO and SRA Using sra-tools and pysradb
- How to Run FASTQ Quality Control with FastQC, fastp, and MultiQC
- Raw Reads to Counts: The Bulk RNA-Seq Pipeline Explained
If the setup above is costing you more time than the biology it supports, try notchbio.app instead. Upload your FASTQ files and the same tools from this tutorial run automatically on our infrastructure.
Further reading
Read another related post
What Actually Happens to Your RNA Sample Before It Becomes Data
From tissue extraction to FASTQ file: a clear breakdown of RNA-seq library prep, sequencing chemistry, and what goes wrong at each step.
BioinformaticsWhen to Use edgeR vs DESeq2 vs limma-voom
DESeq2, edgeR, and limma-voom all test differential expression but use different models, normalization, and assumptions. Here is when each one wins.
Research GuideUnderstanding Your QC Report: FastQC and MultiQC
A module-by-module guide to reading FastQC and MultiQC output for RNA-seq data — what each plot means, which failures matter, and which you can safely ignore.