Your First Nextflow Pipeline for RNA-Seq
The community consensus on workflow managers is consistent: use Nextflow. The honest follow-up that rarely makes it into the same breath is that Nextflow takes a month to feel comfortable with. Not a week. A month. The DAG-based dataflow model, the channel operators, the configuration hierarchy, the way the work directory fills up with hashed subdirectories: all of it is learnable, but none of it is obvious on first contact.
This tutorial takes a different approach from the official Nextflow training materials. Instead of building up incrementally from a single process, it starts with a complete, runnable minimal RNA-seq pipeline and explains every line. By the end you will have a pipeline that runs FastQC, Salmon quantification, and MultiQC on paired-end reads, produces an execution report and a DAG, and works identically on a laptop and on a SLURM cluster. When you understand this pipeline, you are ready to read nf-core pipelines rather than fear them.
The learning curve is real: here is how to manage it
Nextflow’s dataflow model is genuinely different from scripting. Channels are not arrays. Processes are not functions. The execution order is determined by data dependencies, not by the order processes appear in your workflow block. The most effective way to manage the learning curve is to run a complete working pipeline before you try to write one from scratch. Complete the Nextflow hello-world, then run the pipeline in this tutorial with the test data before you modify anything. Understanding what correct output looks like is the prerequisite for debugging why your own pipeline is not producing it.
Installation
Nextflow requires Java 11 or later. Check with java -version. If Java is missing, install via your package manager before proceeding.
# Install Nextflow (Linux / macOS / WSL)curl -s https://get.nextflow.io | bashchmod +x nextflowsudo mv nextflow /usr/local/bin/
# Verifynextflow -version
# Install Docker (if not already present)# On Ubuntu:sudo apt update && sudo apt install -y docker.iosudo systemctl start dockersudo usermod -aG docker $USER   # allows running Docker without sudo (log out/in to apply)
Alternatively, install via conda: conda install -c bioconda nextflow. This is the easier path on HPC systems where system-wide Java installation may require admin access.
The Three Concepts You Must Understand First
Processes are isolated units of work. Each process wraps a shell command or script, declares its inputs and outputs explicitly, and runs inside a container or conda environment. Processes cannot directly pass variables to each other. They communicate only through channels.
Channels carry data between processes. A channel is a queue: one or more processes emit values into it, and one or more processes consume values from it. Nextflow manages the queue automatically. You declare what goes in; Nextflow figures out when to run each process based on what data is available.
The workflow block is where you wire channels to processes. It is the only place where execution order is defined: not by the order processes are listed in the file, but by which channel outputs feed which process inputs.
The Pipeline: Three Processes, One Workflow
Save the following as main.nf. It is a complete, working pipeline:
#!/usr/bin/env nextflownextflow.enable.dsl=2
// ─── Parameters ───────────────────────────────────────────────────────────────params.reads = "data/*_{R1,R2}.fastq.gz"params.transcriptome = "refs/transcriptome.fa.gz"params.outdir = "results"params.multiqc_config = false
// ─── Process 1: FastQC ────────────────────────────────────────────────────────process FASTQC { tag "${sample_id}" container 'biocontainers/fastqc:v0.11.9_cv8'
publishDir "${params.outdir}/fastqc", mode: 'copy'
input: tuple val(sample_id), path(reads)
output: path "*.html", emit: html path "*.zip", emit: zip
script: """ fastqc --threads ${task.cpus} ${reads} """}
// ─── Process 2: Salmon Quantification ─────────────────────────────────────────process SALMON_QUANT { tag "${sample_id}" container 'combinelab/salmon:1.10.0'
publishDir "${params.outdir}/salmon/${sample_id}", mode: 'copy'
input: tuple val(sample_id), path(reads) path index
output: path "quant.sf", emit: quant path "cmd_info.json", emit: cmd_info path "aux_info", emit: aux
script: """ salmon quant \\ -i ${index} \\ -l A \\ -1 ${reads[0]} \\ -2 ${reads[1]} \\ --validateMappings \\ --gcBias \\ -p ${task.cpus} \\ -o . """}
// ─── Process 3: MultiQC ───────────────────────────────────────────────────────process MULTIQC { container 'ewels/multiqc:v1.21'
publishDir "${params.outdir}/multiqc", mode: 'copy'
input: path '*' // collect all QC outputs into one process call
output: path "multiqc_report.html" path "multiqc_data"
script: """ multiqc . """}
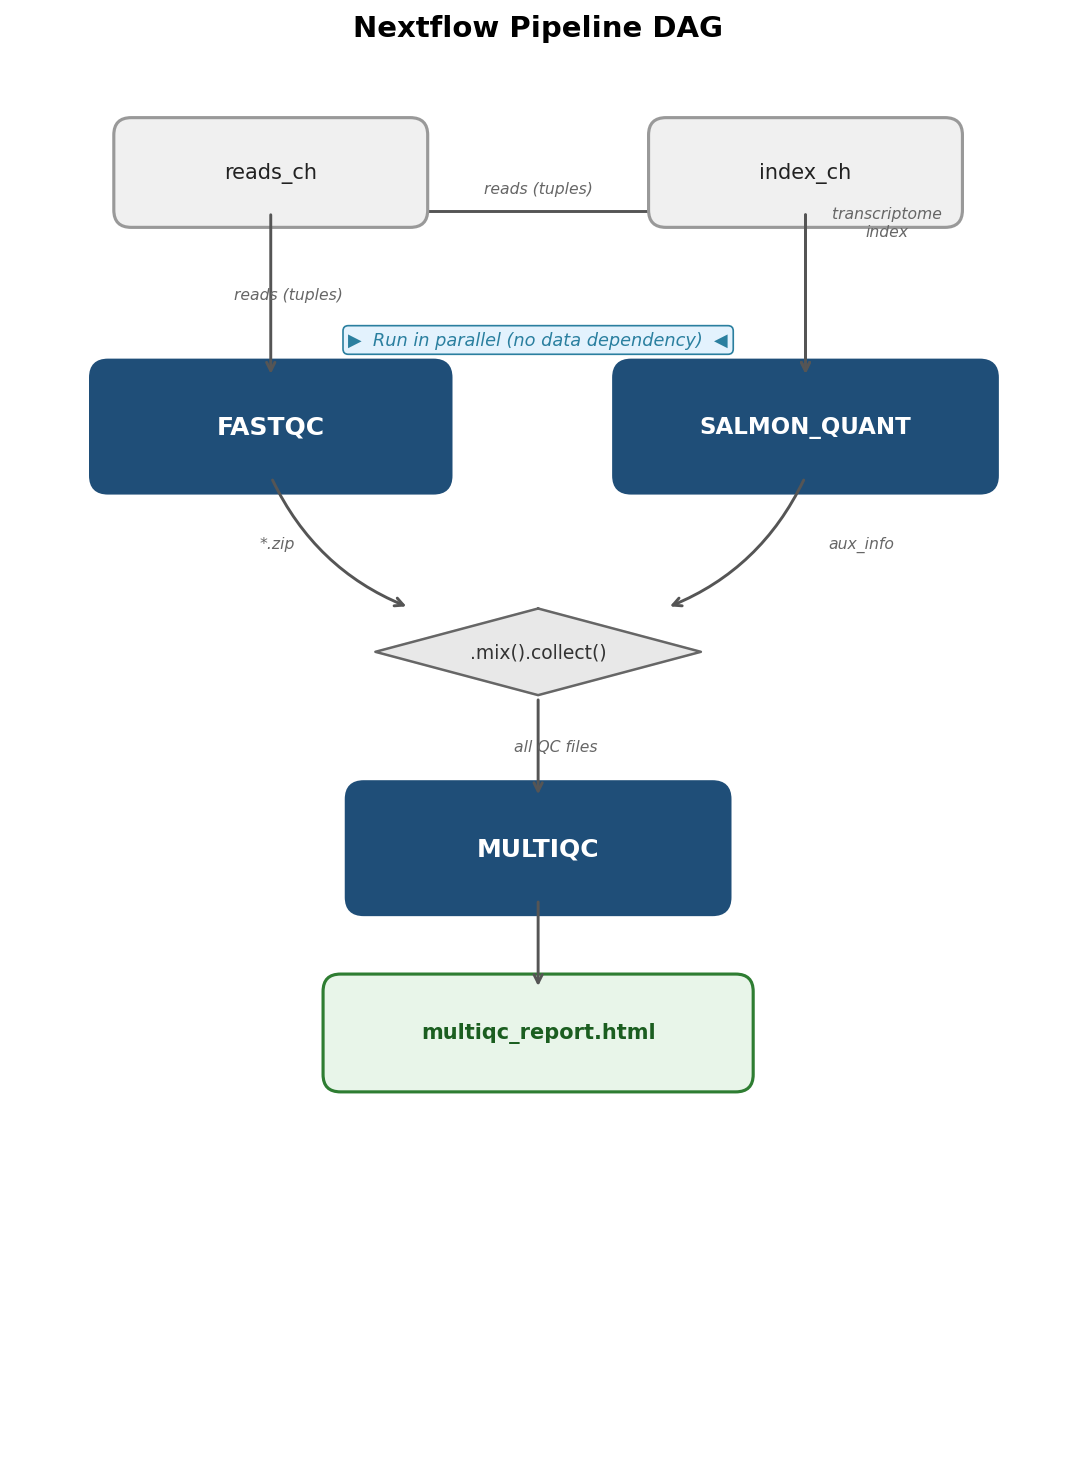
// ─── Workflow ─────────────────────────────────────────────────────────────────workflow { // Create a channel from paired FASTQ files // Each item in the channel is a tuple: (sample_id, [read1_path, read2_path]) reads_ch = Channel.fromFilePairs(params.reads, checkIfExists: true)
// Build Salmon index from the transcriptome FASTA // (simplified here; in practice build once and re-use across runs) index_ch = Channel.fromPath(params.transcriptome, checkIfExists: true)
// Run FastQC on every sample (reads_ch fans out automatically) FASTQC(reads_ch)
// Run Salmon quantification for every sample SALMON_QUANT(reads_ch, index_ch)
// Collect all FastQC and Salmon outputs for MultiQC // .mix() merges two channels; .collect() waits for all items before proceeding qc_files = FASTQC.out.zip.mix(SALMON_QUANT.out.aux).collect() MULTIQC(qc_files)}This is 78 lines. Every line does exactly one thing. The tag directive labels each task in the log with the sample ID so you can see which sample is running. The publishDir directive copies final outputs to the results directory. The mode: 'copy' ensures the output directory does not contain symlinks, which is important for archiving.
The nextflow.config File
Create a nextflow.config file in the same directory as main.nf. This file controls containers, resources, and executor settings:
// Default process settingsprocess {    cpus   = 4    memory = '8 GB'    time   = '2h'}
// Container engine: Docker by defaultdocker {    enabled    = true    runOptions = '--platform linux/amd64'  // needed on Apple Silicon Macs}
// Profiles for different environmentsprofiles {    // Local Docker execution (default)    docker {        docker.enabled = true    }
    // SLURM cluster with Singularity    slurm {        process.executor = 'slurm'        singularity.enabled    = true        singularity.autoMounts = true        process.queue = 'standard'        process {            withLabel: 'long' {                time   = '24h'                memory = '32 GB'            }        }    }
    // CI/testing: minimal resources    test {        process.cpus   = 1        process.memory = '2 GB'    }}
The profiles section is the key to portability. When you run locally you pass -profile docker. When you submit to a SLURM cluster you pass -profile slurm. The pipeline code does not change; only the executor and container engine change.
Running the Pipeline
# Run locally with Docker, generate execution report and DAGnextflow run main.nf \    --reads 'data/*_{R1,R2}.fastq.gz' \    --transcriptome refs/transcriptome.fa.gz \    --outdir results \    -profile docker \    -with-report execution_report.html \    -with-dag pipeline_dag.png \    -with-trace \    -resume
# Run on a SLURM cluster with Singularitynextflow run main.nf \    --reads '/data/project/*_{R1,R2}.fastq.gz' \    --transcriptome /refs/human/transcriptome.fa.gz \    --outdir /results/project \    -profile slurm \    -with-report execution_report.html \    -resume
The -resume flag tells Nextflow to skip any process whose output already exists in the work directory cache. If a run fails after Salmon completes, resuming will skip FASTQC and SALMON_QUANT and re-run only MULTIQC. This is one of Nextflow’s most useful features for iterative development.
Reading the Execution Report and DAG
The -with-report flag generates an HTML execution report showing how long each process took, how much memory and CPU it used, and whether any tasks failed or were retried. Open execution_report.html in a browser after the run completes. The most useful section is the resource utilization table: if a process used 0.3 GB of its 8 GB allocation, you are wasting reservation slots on the cluster. If it used 7.9 GB, you are close to an OOM failure.
The -with-dag flag generates a directed acyclic graph showing the data flow between processes.
Running Locally vs on a Cluster
The biggest conceptual difference between local and cluster execution is that Nextflow submits each process task as a separate job to the scheduler. On a SLURM cluster, each task in your pipeline becomes one sbatch submission. Nextflow monitors the job queue and launches downstream tasks as upstream jobs complete.
This means three things in practice. First, your nextflow process must stay running on the head node for the duration of the pipeline (or be run inside a screen or tmux session). Second, the work directory must be on a filesystem accessible to all compute nodes, which means shared network storage, not local node storage. Third, the containers (Singularity images on HPC) are downloaded and cached on first use; set NXF_SINGULARITY_CACHEDIR to a shared location so the cache is reused across runs.
# SLURM-specific: set cache directory for Singularity imagesexport NXF_SINGULARITY_CACHEDIR=/shared/singularity_cache
# Run inside tmux so the session survives disconnectiontmux new -s nextflow_runnextflow run main.nf -profile slurm -resume# Ctrl+B, D to detach; tmux attach -t nextflow_run to reattach
When To Graduate to nf-core/rnaseq
The pipeline in this tutorial covers the FASTQ-to-counts portion of bulk RNA-seq. It does not handle: strandedness detection, multi-lane sample merging, genome-based alignment for variant calling, isoform-level quantification, or the comprehensive QC metrics that nf-core/rnaseq generates.
nf-core/rnaseq is the production-grade version. It is approximately 5,000 lines of DSL2 across 40 or more modules, handles every major aligner and quantifier, generates STAR, Salmon, RSEM, and HISAT2 outputs simultaneously if needed, and has been validated on thousands of datasets. Running it requires a samplesheet CSV rather than a glob pattern, and understanding its output requires knowing what each tool contributes.
The right time to switch is when you have outgrown your minimal pipeline: when you need features it does not have, when you are running at scale where its optimizations matter, or when you want to submit to a repository that expects nf-core-level QC reporting. Before that point, a pipeline you understand fully is worth more than one you cannot debug.
Nextflow vs Snakemake: The Practical Comparison
| Feature | Nextflow | Snakemake |
|---|---|---|
| Primary language | Groovy (JVM-based DSL) | Python |
| Execution model | Dataflow (push-based) | Rule-based (pull/goal-directed) |
| Cloud-native | Yes (Seqera Platform, AWS Batch, Google Cloud) | Yes (Google Cloud, AWS via wrappers) |
| Container support | Docker, Singularity, Podman, Conda | Docker, Singularity, Conda |
| Community pipelines | nf-core (300+ pipelines) | Snakemake workflow catalog |
| Learning curve | Steep (dataflow model is new) | Moderate (Python-like, rule syntax is intuitive) |
| HPC support | Yes (SLURM, LSF, PBS) | Yes (SLURM, LSF, PBS) |
| Resume/caching | Hash-based work directory cache | Timestamp-based rerun detection |
| Module system | DSL2 modules with semantic versioning | Wrapper system via snakemake-wrappers |
| Bioinformatics adoption | Growing rapidly; dominant in genomics | Strong in population genetics, variant calling |
Both tools are mature and production-ready. Nextflow is the safer choice if you plan to contribute to or build on nf-core pipelines, or if your work will scale to cloud environments. Snakemake is the easier entry point if your team already writes Python and you are building workflows that do not need to fit into the nf-core ecosystem.
Nextflow is great when you need flexibility and scalability. NotchBio is what you reach for when you need results without the month of learning curve. If your experiment is a standard bulk RNA-seq analysis against an annotated transcriptome, you do not need a workflow manager to get publication-ready differential expression results. When you do need one (because your project requires custom steps, multi-cohort processing, or integration with variant calling) the pipeline structure in this tutorial gives you the foundation to build it.
Related Reading
Further reading
Read another related post
Self-Service RNA-Seq For Labs Without A Bioinformatician
If your lab sequences more than it analyzes, here is what self-service RNA-seq looks like, what is safe to automate, and where you still need a human.
TutorialSTAR vs Salmon vs HISAT2: A Hands-On Benchmark
A hands-on RNA-seq aligner benchmark: working STAR, Salmon, and HISAT2 commands, real runtime and memory numbers, and how much the DEG list actually changes.
Research GuideHow To Submit RNA-Seq Results That Reviewers Cannot Reject
Reviewers reject RNA-seq papers for predictable reasons: missing FDR correction, version-less methods, inaccessible data. A checklist that prevents it.